You may often see blurry or unwanted reflection in your camera. It often happens when you have dirt or debris in your camera lens. Clear images are necessary to capture your memories in the best way possible. So, it is essential for you to clean your camera lens in a regular basis.
Besides, you should also do it in the proper way. If you do it wrong, you may end up scratching the lens surface. In this article, you will get to know step by step guide on how to clean your camera lens. I will also share with you the common mistakes that you need to avoid. Let’s slide down to the main details.
Why Should You Keep Your Camera Lens Clean?
There are many reasons why you should keep your camera lens clean. Dust, smudges, or fingerprints on your lens can create blurry spots and unwanted reflections. It will ruin the quality of the images and make you spend more time in post-production.
If you rely on third-party service provider for post-production, then you need to pay more for your retouching works. Besides, you will also not be able to use the camera lens for a long-time. So, it is always best to keep your camera lens clean to avoid these issues.
Tools That You Need To Clean Your Camera Lens
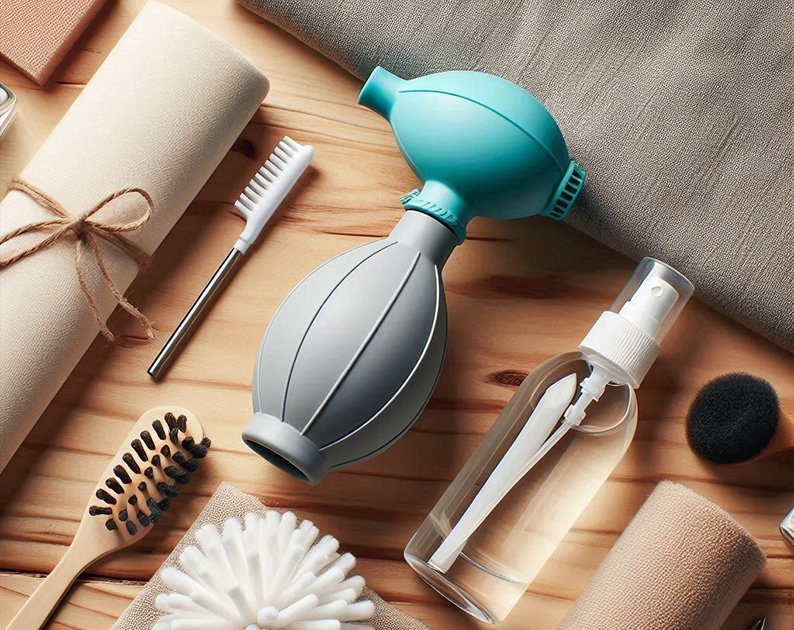
Camera lens need to be cleaned using the right tools. It will ensure that you can safely remove dirt, dust, and smudges without damaging the lens. Each one of the tools have different use cases. Tools that you need to clean your camera lens are shared below with description.
Air Blower
An air blower is perfect for gently removing dust and debris from the surface of your camera lens. It will be helpful before the actual cleaning start. Air flower can eliminate particles which may scratch the lens when you rub them. Besides, you can also use it to reach deep end where you can’t reach because of the close space.

Microfiber Cloth
A microfiber cloth is a must-have for wiping away fingerprints, smudges, and dirt. If you use regular cloth, then you may scratch the lens. Microfiber cloth is soft and designed to absorb oils and grime. Protect your lens from any unwanted scratch while you are scrabbing.
Cleaning Solution
A simple and effective homemade cleaning solution can be made using common household items. Distilled water, isopropyl alcohol and one drop of dish detergent can made great camera lens cleaning agent. Besides, Zeiss and PANCRO are popular brand for commercial camera lens cleaning solution.
Step By Step Guide To Clean Your Camera Lens
Clean camera lens is essential for capturing high-quality sharp photos. Dirt, dust, and smudges on the lens can affect image quality and make post-production more difficult. A step-by-step guide to ensure your lens stays spotless and scratch-free is shared below. Let’s take a closer look.
Step 1: Turn Off Your Camera
You should always turn off your camera before you remove the camera lens. It will be helpful to avoid accidental damage. If you detach the lens while the camera is on, it could expose the sensor to dust. So, it is better to take some precautions.
Step 2: Detach the Lens from the Body
Once you have turned off the camera, you are ready to detach the lens from the body. It will give you better access to both the lens and the camera’s mount area. Besides, you should also be in a clean environment when you are detaching the lens from the body.
Step 3: Use an Air Blower
You can gently blow away any loose dust or debris from the lens surface using an air blower. Many of us seem to use breath to remove the initial dust. But it can leave moisture on the lens. So, it is better for you to use an air blower for the work.
Step 4: Apply Cleaning Solution to Microfiber Cloth
Never apply cleaning solution directly to the lens. Besides, you need to be careful if you are using a homemade solution. Make sure it is not going to be harmful for your camera lens. Put a small amount of cleaning solution into the microfiber cloth. Don’t go overboard with it.
Step 5: Clean the Lens Surface
You will use the microfiber cloth to clean any remaining dust or smudges on the lens. Apply light pressure and use circular motions to avoid scratching the surface. If you see any remaining streaks or smudges, repeat the cleaning process with fresh solution and a clean section of the cloth.
Step 6: Final Inspection
Once your lens looks clear, you are ready to do the final inspection. If everything looks good, then you are ready to capture stunning photos with a spotless lens. Otherwise, you need to repeat the similar camera lens cleaning process.

Common Mistakes To Avoid When Cleaning Your Camera Lens
Cleaning your camera lens is good for maintaining great image quality. But improper cleaning techniques can do more harm than good. So, you need to avoid these common mistakes to keep your lens in top condition. Let’s get to know about some of the common ones.
- You need to clean your lens regularly to prevent dirt and dust build up over time.
- Always use a solution specifically designed for camera lenses, otherwise it can damage the lens coating.
- You need to avoid exhaling on the lens to create moisture for cleaning because it can leave smudges.
- Make sure you are in a clean environment to avoid new dust particles when cleaning.
- Paper towels and tissues are abrasive and can scratch your lens.
- Not blowing away loose dust first can cause particles to scratch the lens during cleaning.
- Cleaning your lens too frequently can also wear down its protective coating.
Conclusion
You already know how to clean your camera lens in the right manner. Besides, you should also try to avoid the common mistakes and make your cleaning procedure flawless. Gather the right tools like air blower, microfiber cloth, and a lens-specific cleaning solution before you start the cleaning process. Maintain a spotless lens and save time in the post-production. Stay with us for more updates shortly.


Pingback: Lifestyle Photography: A Deep Dive into the Art of Everyday Storytelling - Fast Clipping Path - Professional Photoshop Photo Editing and Retouching Services